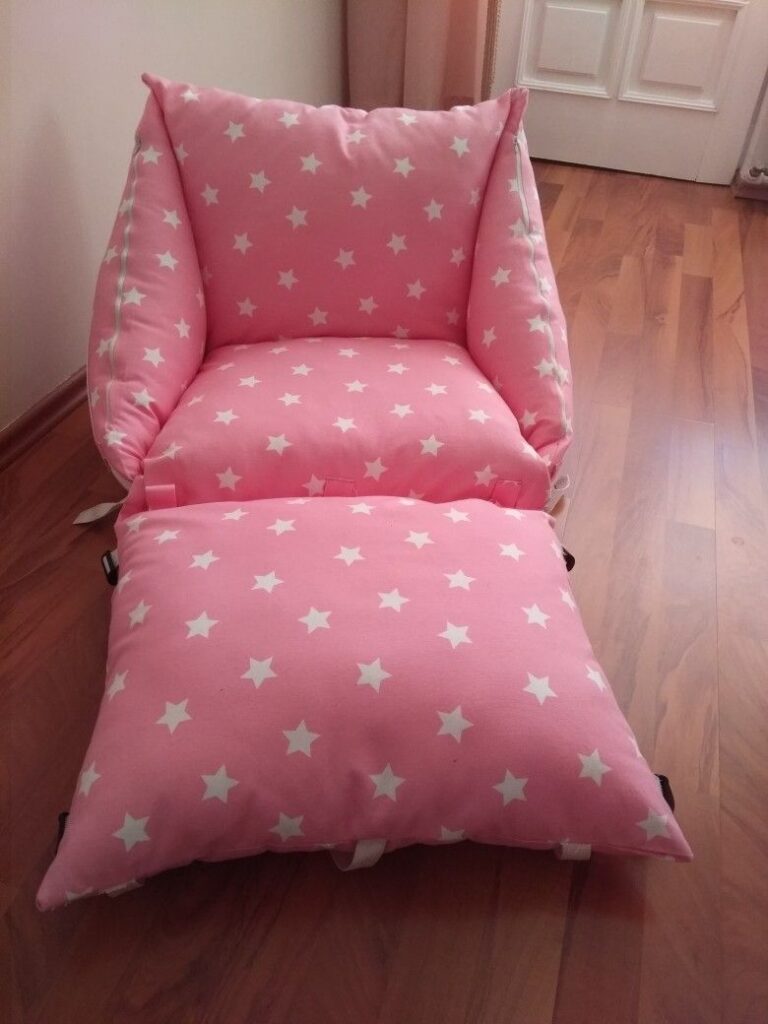
Folding floor armchair with cushion.

How to Sew a Structured Toiletry Bag, sewing a structured toiletry bag is one of the most practical and rewarding sewing projects for beginners and experienced crafters alike. A well designed toiletry bag not only keeps personal care products organized but also adds a professional and stylish touch to your travel essentials. Whether you want to create a durable travel organizer, a handmade gift, or a product to sell, learning how to sew a structured toiletry bag with a complete pattern and accurate measurements is essential.
In this detailed guide, you will find step by step instructions, a complete pattern with measurements, material recommendations, and professional finishing tips. By the end of this article, you will have the knowledge and confidence to create a structured toiletry bag that is functional, durable, and visually appealing.
In addition to its practicality, a structured toiletry bag reflects attention to detail and thoughtful design. Unlike soft pouches that collapse when partially filled, a structured model maintains its shape, protects delicate items, and offers better visibility of its contents. This makes it especially useful for travelers, professionals, and anyone who values efficiency in their daily routine. By following a complete pattern with precise measurements, you ensure balance, durability, and a polished appearance that elevates your handmade project to a professional level.
Before starting your project, gathering the right materials is crucial. A structured toiletry bag requires stability and durability, so fabric choice and reinforcement are important.
Exterior fabric: cotton canvas, quilting cotton with interfacing, faux leather, or waterproof fabric
Lining fabric: lightweight cotton or water resistant polyester
Fusible interfacing: medium to heavy weight for structure
Zipper: 20 cm to 25 cm depending on desired width
Polyester thread for strength
Optional: piping, bias binding, decorative label
Choosing quality materials ensures that your structured toiletry bag maintains its shape even when filled. If you plan to use the bag for travel, waterproof or water resistant fabrics are highly recommended.
Sewing machine
Zipper foot
Fabric scissors or rotary cutter
Cutting mat
Measuring ruler or quilting ruler
Pins or fabric clips
Iron
Accurate tools make it easier to follow a complete pattern with measurements and achieve professional results.
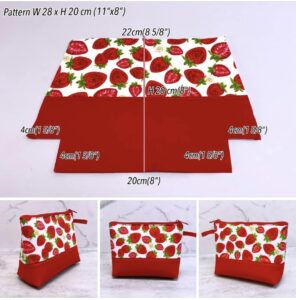
Precision is key when sewing a structured toiletry bag. Below is a standard medium size pattern ideal for travel and daily organization.
Width: 20 cm (8 inches)
Height: 15 cm (6 inches)
Depth: 7 cm (2.75 inches)
Exterior Main Panels (Cut 2)
22 cm x 20 cm
Includes 1 cm seam allowance
Lining Panels (Cut 2)
22 cm x 20 cm
Fusible Interfacing (Cut 2)
20 cm x 18 cm
Base Corner Cut for Boxed Effect
4 cm x 4 cm square removed from each bottom corner
These measurements create a stable rectangular toiletry bag that stands upright.
Cut two exterior panels according to measurements.
Cut two lining panels identical in size.
Fuse interfacing to the wrong side of the exterior panels.
Cut a 4 cm square from the bottom corners of each piece to prepare for boxed corners.
Using exact measurements ensures symmetry and structural integrity.
Now that your pieces are cut and prepared, follow these instructions carefully to assemble your bag.
Place one exterior panel right side up. Position the zipper face down along the top edge. Place one lining panel right side down over the zipper. Sew along the top edge using a zipper foot.
Repeat on the other side with the remaining exterior and lining panels. Press seams open and topstitch along both sides of the zipper for reinforcement and a professional finish.
Open the zipper halfway to allow turning later. Place exterior panels right sides together and lining panels right sides together. Pin around the edges.
Sew around the entire perimeter, leaving a 7 cm opening at the bottom of the lining for turning.
Ensure corners align perfectly to maintain structure.
To give your toiletry bag depth and allow it to stand upright, boxed corners are essential.
Align the side seam with the bottom seam at each corner. Flatten to form a triangle shape. Measure 4 cm across and sew a straight line. Trim excess fabric, leaving about 1 cm seam allowance.
Repeat for all four corners including lining.
This step transforms your flat pieces into a structured three dimensional bag.
Turn the bag right side out through the lining opening. Carefully push out corners for sharp edges.
Sew the lining opening closed with a straight stitch. Push the lining inside the bag and shape it neatly. Press lightly for a crisp and polished appearance.
Your structured toiletry bag is now complete.
Once you master how to sew a structured toiletry bag, you can customize the design to match your personal style or business branding.
For better organization, add a slip pocket to the lining before assembly. Cut a rectangle 20 cm x 12 cm, hem the top edge, and stitch it onto the lining panel. You can divide it into sections for smaller items.
Mixing different exterior and lining fabrics creates visual interest. Neutral exteriors with patterned linings are especially popular.
For extra stability, consider adding foam interfacing instead of standard fusible interfacing. This provides a firmer structure and premium feel.
Attach a small fabric loop to one side seam before sewing the body. This makes the bag easier to carry and hang.
If the bag will store liquids, choose a waterproof lining material to prevent leaks from damaging the exterior fabric.
Learning how to sew a structured toiletry bag with a complete pattern and measurements offers several benefits. First, it teaches important sewing techniques such as zipper installation, boxed corners, and interfacing application. These skills can be applied to many other sewing projects.
Second, a structured toiletry bag is highly functional. It keeps personal care products organized and protects other belongings from spills. Its upright design allows easy access to contents.
Third, handmade toiletry bags are popular products for craft fairs and online shops. With precise measurements and professional finishing, you can create items suitable for sale.
Finally, this project allows room for creativity. From fabric selection to decorative details, every structured toiletry bag can reflect personal style.
Mastering how to sew a structured toiletry bag using a complete pattern with measurements is a valuable skill for any sewing enthusiast. With accurate cutting, proper interfacing, and careful assembly, you can create a durable and attractive bag that stands upright and functions beautifully.
Whether you are sewing for personal use, gifting, or selling, this structured toiletry bag design combines practicality and style. By following the detailed steps outlined in this guide, you ensure consistent and professional results every time.
Take your time, measure carefully, and enjoy the process. A well made structured toiletry bag is not only a useful accessory but also a reflection of your craftsmanship and attention to detail.


